Posted in books, Guides, Resources, Selfstudy, Study With Me, Uncategorized

Study With Me: TTMIK Your First Hanja Guide

Good evening guys!
Yesterday I finished the ‘Your First Hanja Guide’ book by Talk To Me In Korean and I wanted to share with you all how I’ve been studying with the book every day, for the past few months.
Before I begin I would like to mention that I really enjoyed working with the book and I definitely recommend it if you want to try studying Korean through hanja. If you are curious about the book then I recommend that you read this review by the brilliant Sofie,  watch this video by TTMIK themselves or you can read more about it on the mykoreanstore website where you can also buy the book.
Alright, let’s begin!

As always, I begin by preparing the things I need.
I usually have the book I’m studying with, my notebook, pens, correction tape and 원고지 paper. Start

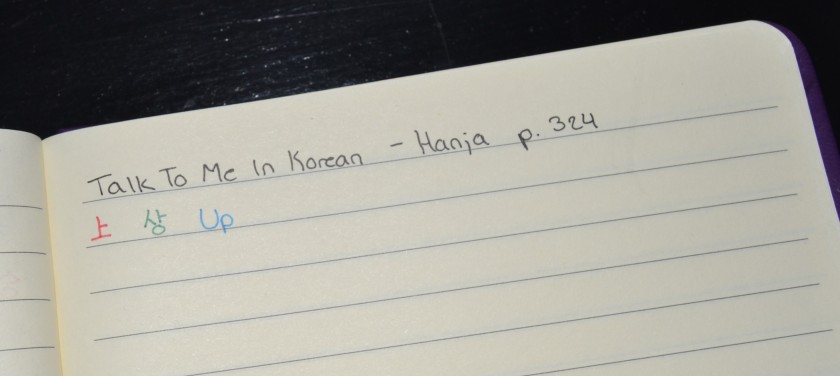
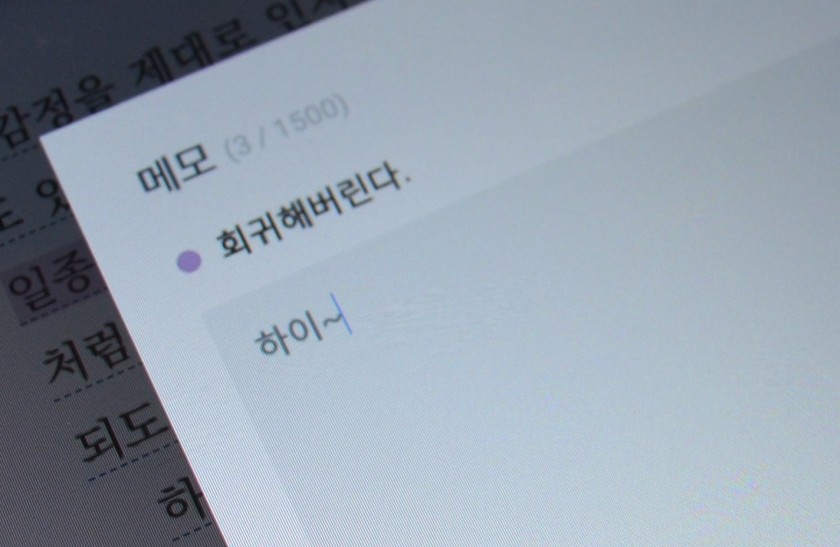
I always begin by jotting down what book I’m working with, along with the page, subject or whatever else I find interesting.

Intro

I then open up my 원고지 notes and practice writing the character. The thing is, if you are only going through these hanja characters in order to improve your Korean skills, then you don’t need to practice writing them at all. As long as you know that they exist and what they mean, then you really don’t need anything else.
However, I have known for almost two years now, that I want to learn Chinese in the future, so I’m basically using this as an opportunity to get more comfortable with the different characters and their strokes, so in my case it simply makes sense to put a little more effort into my notes. I also found it oddly calming to repeat all the strokes over and over again. It reminds me of the reasons why I bought some calligraphy books in Korea. Maybe I’ll pick them up soon and give it a try..

Practice

I then go on listen to the accompanying audio files twice. The first time I simply listen carefully to the pronunciation and intonation, and the second time I read aloud while listening. Lastly, I then read the words and sentences aloud once again, without listening to the file, while trying to sound as natural as possible.

Track

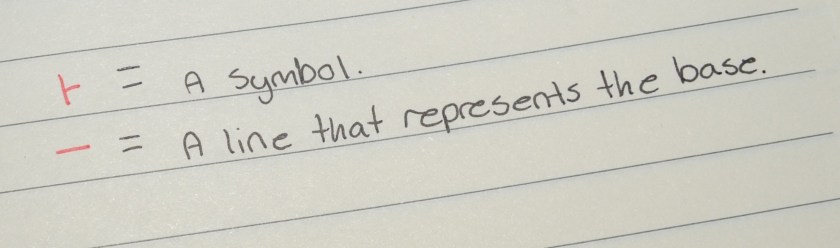
I then move on the jot down some notes about the hanja character. I write down whatever I find interesting or relevant in order for me to better remember it the next time I see it, or to help make it easier for me to tell it apart from other characters.
It can be a breakdown of the characters that help create the new character or it can be some notes on how the character got it’s meaning.

Breakdown

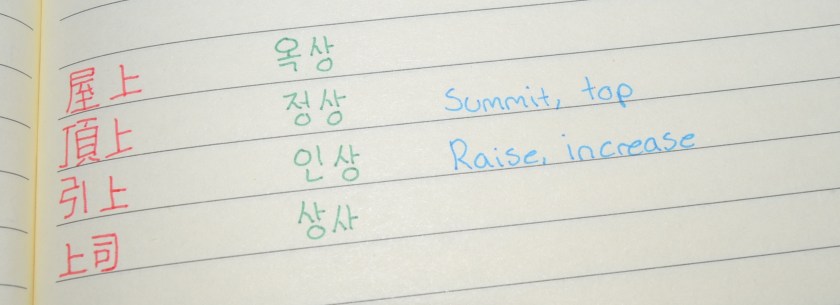
Once I feel like I have written down anything of interest, I move on to write down the list of Korean words that are based on that hanja character. As always, I color code my notes. In this case, hanjas are always written in red, to make easier for me to spot them in my notes. After writing down all the hanjas, I take out my green pen and write down the words in hangul next to the hanja. That way I can actually read the words that I’m working with.
Lastly, I take my blue pen and write down the definition of the words that I didn’t know already.

vocabulary

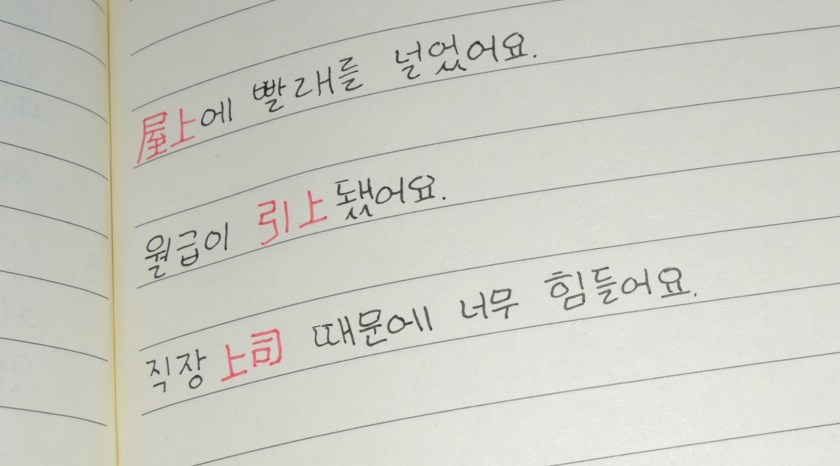
As the last part I write down the sample sentences. I do this in order to get more familiar with both the hanja word, the sentence structure and spelling of the different words. It can be really helpful to copy down some notes like these. I also avoid writing the hangul version of the words in the sample sentences. I do this because I want to encourage my brain to start remembering them without the hangul. It usually isn’t a problem since the rest of the sentence kinda gives the meaning away, and if not then I can simply find the hanja in my notes right above the sample sentences.

Example sentence

And that’s basically it! It’s pretty simple but I get to read, listen, write and speak as well,  so I found it quite helpful.
As for time, this specific character was pretty simple and didn’t take a lot of time, but some characters are a lot more tricky and has a lot more related words, so it’s going to change a lot depending on the characters your working with.

I hope you all found some inspiration to study with this (or another) book.

Posted in books, Guides, Resources, Selfstudy, Uncategorized

Ridibooks (reader) – The Korean learners best friend

I have talked about how reading in your target language can approve your language skills a few time before so I’ll try not to repeat myself today. You might find this and this helpful though!
Instead I would like to introduce you all to the Ridibooks reader app. Ridibooks is a Korean ebook website with a huge variety of books to chose from. Everything from Manwhas and self improvement books, to fiction, history books and magazines. They even have free books right here – No more excuses!
I have mentioned the site before and no I’m still not sponsored or anything. Just a genuine fan!
Lately I have been reading ebooks more often than I used to and honestly, I still prefer physical books. However, I have come to really appreciate ebooks and especially the ebook reader that ridibooks offer, which is why I’m now here to give you guys a tour of this great tool, from a language learners aspect!

When you open the app, you’ll find the books that you have downloaded on the device that you are using. There’s not much to say about this as it is pretty straightforward.
At the bottom of the screen you’ll find a little menu.

Right now we a at the first icon 내 서재 (My library).

Screenshot_20180317-122514

The next icon is 구매 목록 (Purchased books). This shows all of your books, including those that you haven’t actually downloaded on your current device. From here you can download the next book you would like to read. (or re-read)
As you can see from the pictures, I have a few books that I haven’t downloaded because I read then via my laptop, before I got my studybuddy (My tablet).

The next icon is 서점 (Bookstore). If you click here you get transferred to the ridibooks website where you can take a look around for new books. This too is pretty straightforward.

Screenshot_20180317-122627

The 4th icon is 검색 (Search). This is also pretty straightforward. You simply search for whatever book you are interested in and then it’ll redirect you to the website if they have the book you searched for. I never use this to be honest as I feel like it makes more sense to just go straight to the webshop.

Screenshot_20180317-122656

Okay, so enough of the standard boring stuff lol.
If you click on a book from you library it’ll open on the page that you where on the last time. You can also add your own bookmark by clicking on the icon in the upper right corner, but I have never experienced that the app doesn’t automatically saves the page so I haven’t used that feature in years. I guess I’ve gotten lazy.. 그냥.. 귀찮다 ㅎㅎ

Anyway, this is the page that I was on when I took the screenshots a few days ago, in a book called 말 그릇. I’ve talked about it on instagram but I think this is the first time that I’m mentioning it on the blog. You can find it here if you’re curious.

Okay this is where all the fun stuff happens!
At the bottom of the screen you can see how far along you are with the book which is always fun and next to that you have a 듣기 (listening) icon. It’s not an audio book though so I don’t really use that function, since it’s just a typical ‘robot’ reading.

Screenshot_20180317-122751

The next icon is 목차 (Table of contents). You can see how far you are along and you can also use it to skip to a certain chapter if you wish. I sometimes use it as a shortcut if I want to re-read a certain part of a book.

Screenshot_20180317-122806

The third icon is 동서노트 (reading notes).
This. Is. THE. Best. Feature!
Okay so let me explain. When reading an ebook through this reader, you can mark a word from the text and a list of new features will appear.
The first feature is 형광펜 (Highlighter), which works just like a physical highlighter. You can use this feature to highlight any word or sentence that you find useful or that you need to remember.
The next icon is the purple dot. The color of the dot indicates what color you use to highlight with and if you tap on the dot, a variety of colors will show up, allowing you to easily switch back and forth between colors. In other words you can do color coding! Use one color for new vocabulary, another for new grammar points and a third color for names and locations. It also gives you the opportunity to underline a word instead of actually highlighting it. Whatever you need!

marker optionsColorcoding

The next feature is 메모 (Memo). By clicking on memo you’ll get a little box where you can add.. well. A memo.. To the word that you have marked. It could be the definition or maybe a sample sentence using the highlighted word. It so cool! And yes this genuinely makes my little geeky heart excited.

Saving a memo

If you chose to add a memo, then you get a little symbol by the word to remind you that you added something to it.

The next icon is 듣기 and it works just like the 듣기 at the bottom of the screen, except it only reads the part that you have marked.
If you tap at the 3 dots next to 듣기, then you’ll get two more options called 검색 (Search) and 공유 (Share).

other options
Search is probably my favorite feature. It you tap the search button then the app will connect you to Naver Dictionary. This means that you can look up words straight from the book without ever leaving the app. Once you’ve gotten the information that you needed, you simply tap the arrow in the upper left corner and you be back on the page you where reading.
It’s just so freaking convenient!

dictionary

As for the share option, it’s not at all a necessity but I really really love it! If you tap the share button, then you get two alternative ways of sharing it.
The first one is 이미지로 멋지게 공유 (Share as a cool picture) and 텍스테로 공유 (Share as text). I love the picture option. If you come across something inspiring or noteworthy then you can immediately create a beautiful quote picture, which can then be uploaded from the app, straight to you social media accounts.
Again, not at all a necessity, but still really cool!

shareing

Screenshot_20180317-124222

Okay, so that was all of the options that appear when you mark a word. Now let’s get back to the 동서노트 (reading notes) icon at the bottom of the screen. It you tap the reading notes icon, then you get a list of all the additions you made to the page. In my case, you can see that I highlighted new vocabulary with the purple marker, and now every single word that I have highlighted has been added to this long vocabulary list. If you do color coding then you can also make it show the words or sentences that are highlighted with a specific color. You can also access the memos that you make from this page.
I use the feature really often to create online flashcards via memrise or quizlet. I simply copy and paste the words.
You can also use it to track your progress. Try accessing a list from a book you read a year ago, and see how many of the words you know now. It’s a lot of fun!
If you wish to delete a note from the list, you simply tap the three dots next to the note and choose 삭제. Super simple!

Screenshot_20180317-124439

It’s also possible to change the font size, colors and so on, you simply tap the 보기 설정 icon. You can adjust pretty much everything you want to.

Screenshot_20180317-124300

As I mentioned in the beginning of this post, I still prefer hard copies and writing my notes in hand, but you literally have any tool you might need for language learning, through this reader. I use it on a daily basis because it’s just too convenient not to, especially on days where I’m out and about or traveling. I totally recommend giving it a try if you are learning Korean!

Posted in books, Resources, Selfstudy, Uncategorized

REVIEW: Real-life Korean Conversations: Intermediate – By TalkToMeInKorean

I ordered this book by TTMIK around the time they published it, but I didn’t get to start using it until just recently. I have now finished it and as I have promised a few people, I’m now here to share my thoughts with all of you!

1

Table of content:

toc

Structure breakdown:
Each chapter begins with a 2 page dialog which is then followed by a vocabulary list.

2

3

4

vocab
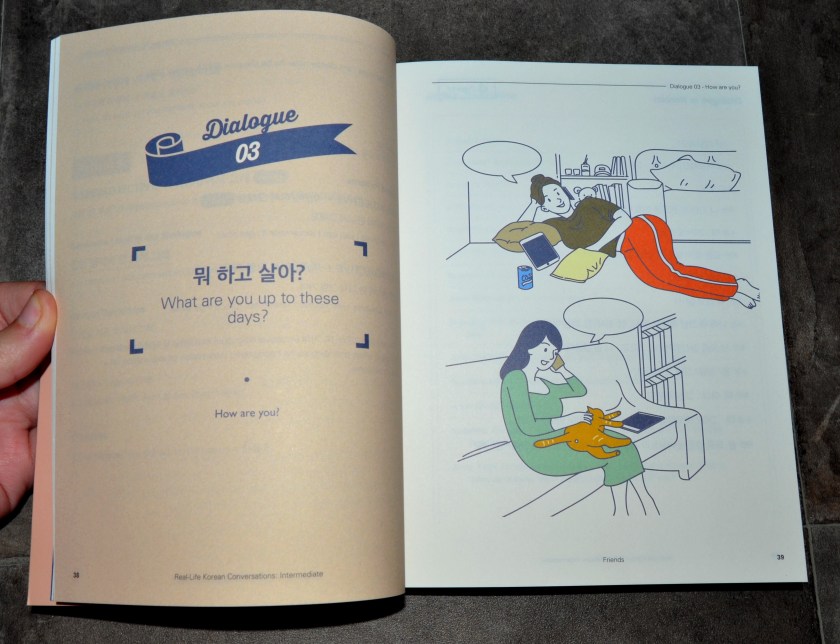
After reading the dialog and following up on the vocabulary, the real fun begins. A grammar pattern from the dialog is introduced and followed by a few sample sentences that allows you to become more comfortable with that specific pattern.
You then have two short assignments involving that pattern. The TTMIK crew guides you through the vocabulary so you only have to focus on the actual pattern and how to use it. Below the assignment you’ll find the answer key.

p
After checking your answers, you see two other patterns that are related to the main pattern that you are learning, which then introduces two alternative ways of expressing the same thing as the main pattern. It can be by using other words, another type of grammer or even another level of politeness. Below these patterns you’ll also find a sample sentence as well as information on why the pattern is different/similar, how to use and when to use it.

final

Each dialog has three main patterns, that all comes with assignments and alternative patterns.

Good things:
– When reading the dialog, the Korean version is on the left side, and the English version is on the right side. This way you can check how much of the dialog you understand line by line if you wish without having to flip back and forth between pages, or if you are more like me, then you can easily skip the English version completely. You can adjust it according to your preferences.

– The book comes with audio files. A useful tool for any language learner.

– Vocabulary list. A really helpful tool and a good indicator of your level. I’m always excited if I know most of the words on the list. Also, it makes it easier to study on the go, because you don’t need a device to look up the words (though I’m sure most of us just do in through our smartphones anyway).

– The same grammar pattern can be found in different chapters. This is really helpful when it comes to expanding your knowledge of how to use that specific pattern. It’s also a great reminder that there’s never just one way of expressing yourself

– The answer key is printed right after the practice assignments, in a discreet font and color. This is GREAT! When I do assignments in books, I check the answers after each assignment because I don’t want to complete a full page of assignments just to discover that I had misunderstood what I was supposed to do. However, this usually means that I have to go back and forth between the assignment and the answer key. This is why I love it when books have the answer key printed along with each assignment.
As mentioned above, it’s very discreet so you don’t have to worry about the answers jumping to your eyes before you actually need them.

– The book changes between the different politeness levels, unlike many other books who only teach the 존댓말 version.

– The general design of the book is great. It’s user friendly and pleasing to the eyes.

– It has cute drawings with empty speech bubbles. Okay this might sound odd, but think about it! You can go back write your own example sentences using the grammar that you just learned. Sounds like fun to me!

– Fun and realistic dialogs. I know that it kinda says so in the title, but trust me, titles aren’t always honest. I had quite a few giggle moments while going through the book and many of the situations were super relatable.

What could be improved:
Nothing really.

Final thoughts:
Overall I really liked the book. Personally it was mainly reviewing for me, as most dialogs only had 1-3 unknown words and I only came across  1 unknown grammar point. For a short time I also wished that the dialogs had been a bit longer, but that’s all just because I’m at an high intermediate stage. If you’re a high beginner/low intermediate stage then this book would be absolutely perfect for you. At this stage it’ll be very helpful to have a book that explains and compares similar grammar patterns as well as help expand you vocabulary. It’ll also help you gain some confidence if you find it difficult to practice with native speakers.

If you’re interested in the book then you can find it right here! They also have it in ebook format and in a beginner edition as well.

Also, I did take a few pictures while studying with the book, so I’ll have another ‘Study With Me’ post up, in a week or so!