Posted in books, Dealing with stress, Personal, Podcasts, Resources, Selfstudy

Audiobooks and selfcare

My main listening practice comes from podcasts, youtube, and dramas but a few days ago I discovered that my favorite podcast app 팟빵 also have an Audiobook menu. There are plenty of book reading podcasts but this menu is just ordinary audiobooks that you can buy and listen to via the app. I have wanted to try listening to audiobooks for a while as there’s a big difference in following people chat about this and that (which most of my favorite podcasts are doing) and listening to a story. I was curious to see if I would be able to hold on and follow along.
I was looking at a few titles and ended up picking 시시한 사람이면 어때서. I knew nothing about the book but I really liked the title and felt a need to listen to some sort of feelgood story, and as I just threw myself into this new mini-adventure, I discovered that it was exactly what I needed.
It’s an essay collection and almost all of the thoughts and stories hit home so hard that I ended up listening to the entire book in one go. It took a little over 2 hours and I not only managed to follow along but I actually felt a lot better about myself afterward.
I definitely recommend that you read or listen to this book or any other feelgood book if you don’t feel great.
I also really recommend audiobooks in general. It’s a great way to get some practice in while doing mindless work like cleaning.

Posted in Dealing with stress, Personal, Resources, Selfstudy

Journaling and decorating

Almost a year ago I started a new project. I started my language journal as a test to see if it would change my writing skills and vocabulary and the plan was to try and write something at least once a week. I found it really hard to get my thoughts out at first and as I had made a rule of not having any rules, other than writing everything in Korean, I quickly ended up with a lot of study notes, stickers and tape to fill out the pages.
However, I slowly shifted to writing my actual thoughts on different topics as well as diary entries from days that I wanted to revisit and remember in the future. I still decorated my pages a lot. I have always LOVED stickers and used to collect them as a child, and I love washi tape too but have never had a reason to buy any. I had fun decorating as much as I had with the actual writing and then one day I got a comment on my Instagram from a girl in Korea. It was nothing special but as I checked out her pictures I saw that she too wrote a diary and spent time decorating it. Looking at her pictures I discovered a bunch of hashtags and I immediately felt super excited.
It turns out, diary decorating, is an actual thing! Especially in Korea.
#다이어리꾸미기 #다꾸기
Who would’ve known? There’s a huge community online of people who share my somewhat newfound love for both journaling and decorating, and I instantly felt right at home! There are blogs, Instagrams, Youtubers, chatrooms, and forums.
It has been about 6 months since I discovered this new and very beautiful world and my sticker, stamp and washi collection has grown very big, very fast! And my vocabulary has grown too, though I wasn’t really in the way I had planned, haha!

As for the more study related part, I actually do feel a lot more comfortable with writing.
I start by writing my entry on my laptop and then I send it to my italki teacher who then returns it with corrections. And then I rewrite the corrected version into my actual physical diary. By now I have done it so many many times that I know that one page takes 150-200 words to fill out with the way I decorate. If I have more to say then I write more pages, if I have less to say then I add more stickers. It’s so much fun, super helpful and it doesn’t at all feel like studying to me.

I guess what I’m trying to say is that whatever hobby you have, try emerging it with your language learning. I have made several new friends through my journaling and I’m so happy I discovered this little world.

Posted in Guides, Resources, Selfstudy, Uncategorized

Getting the most out of Memrise

I have been using Memrise pretty much since I started studying Korean and while I don’t use it religiously, I still consider myself a somewhat regular user.
I know that Memrise is often connected with the idea of simply memorizing, which some are for, some are against, and others just don’t really care. I have already talked about my thoughts on memorizing here so I won’t be talking about any of the pros and cons today.
However, I do want to talk about how to actually get the most of using the Memrise App or Website.
I assume that you all know about Memrise but in case you don’t, it’s a basically a flashcard App/Website with both premade and user-made sets, that uses spaced repetition to get the best results out of the time you spend on it.

  1. Create your own sets.
    Memrise comes with a ton of already made sets for different languages and topics, made by Memrise themselves, as well as access to all of the other users’ sets. Naturally, it is very tempting to simply pick a course or set and get started immediately.
    However, by making your own set you, first of all, make sure that the words you enter, are words that you actually need learn right now. That’s why you’ve come across them in your studies in the first place, right?
    Secondly, by sitting down and looking up each word on your own, and then writing them down along with their meaning, you will already get a pretty good foundation to continue building on. The words will attach to your brain in a completely different way than when you simply see a new word and its meaning.
  2. Use the Meme option to add a sample sentence.
    Memrise has a Meme option for each added word. You can add a picture, an actual meme or my favorite, add a picture with a sample sentence on it. That way you will keep the context no matter if you are learning a new word, an expression or a new grammar point.
    You can make your own sample sentence or if you want to make sure that there are no mistakes in it, then simply copy the sentence where your first came across that word or expression.
  3. Set goals for the streak.
    Memrise has a streak system, and you can set goals for each set. That way to can create a goal of how much you wish to practice every day, no matter how much or how little time you have available each day.
    The streak itself does nothing for your learning, however, it adds some accountability as well as a game-like aspect to studying. It gives you a visual overlook of your studies and I personally find that even though I don’t really think about it on a daily basis, I do find myself slightly upset by the thought of missing a day, when my streak is over 10 days.
  4. Don’t use your hints.
    Depending on whether you have a standard or a pro membership, you might have ‘Hints’ available when you are practicing your sets, and my advice is to simply ignore them completely. The thing is, that if you use your hints to guess a word, it doesn’t get marked as a wrong answer even if you use hints to guess every single part of the words. And that means that the word will show up less and less during reviewing when you actually need it to appear more often instead since you obviously didn’t remember it on your own. Also, when the words get marked (mistakenly I might add) as correct, then the words won’t be added to ‘Difficult words’. I’ll talk more about that further down!
  5. Don’t spend too long on figuring out the answer.
    Sometimes all you need is a little time to think, however, I recommend that you don’t spend too long figuring out the answer. I usually tell myself that if I was having a conversation right now and wanted to use that specific word, would I be thinking about it for this long, or would I have skipped it and reformed my sentence by now to keep the conversation going. If I would have skipped it in a conversation then it’s time to skip it during the review as well. This will automatically mark it as wrong and it’ll start appearing more often for practice so that you will be able to recall it faster in the future.
  6. Difficult words are your friend.
    Memrise has a special set called ‘Difficult words’ under each created set. While it sometimes seems like a failure to have any words in that set, it truly is your best friend. Whenever you get a word wrong or skip it, they all end up in that set where you get the chance to practice those words a bit more than the other words. If your goal is to be able to actually use all of these words without hesitation, then don’t feel bad about your difficult set. Just give them the extra love that they need.
  7. Don’t study words without context.
    Avoid studying words from a random list without any context. Many words have several meanings and it’s SO HARD to unlearn something again, no matter how wrong it might be. The context itself will also help you remember whatever you are learning.
    Also, I don’t see any reason to learn from such a list. I mean, I already find tons of unknown words while reading and studying, so why not just work on those words, that you have actually met in a proper context?
  8. Avoid set where words are in alphabetical order.
    If you do decide to practice sets that are premade or words that are based on a random list, at least avoid sets that are made in alphabetical order. Seriously. Just don’t. The words will be introduced in the order they have been added which means that you might get 10 words in a row that all starts with 인 and it. will. mess. with. your. brain.
    Every single word will blend together and so will the meanings of each word. It is the absolute worst thing you can do.


I hope you guys find this helpful and feel free to add your own tips for Memrise in the comments. I think we all need the help we can get, haha!

Posted in Personal, Resources, Selfstudy, TOPIK, Uncategorized

Challenges —> Opportunities

So.. I told myself to not join any Kmooc courses until after my exam in November, as they take a lot of time, and I feel like I’m better off with my books right now. So obviously I signed up for no less than two courses. Whoops^^
They have so many interesting courses lately and it’s just so hard to not sneak a peak once in a while, and as soon as something catches my eye, I can’t let it go, haha!

I still feel like I should be focusing on my books, but in my defense both courses are a lot less intense than the ones I have taken before and I do honestly think they can turn out to be helpful. I think they might give my studying an extra boost while also serving as a breath of fresh air during my otherwise exam focused studies. Just as importantly, I think they might add some value to my life in general. It’ll be worth it.

The first course I enrolled in is called 인간과 삶, and it covers a bunch of topics like life, death, society and economics. I’m thinking that this course might come in really handy for the 쓰기 part of my exam, as the essay will most likely involve some (or maybe even all) of those topics and I’ll be able to learn words and phrases that can secure me a few extra points or at least cause me to give more thought on these topics.
I’m actually really excited to see what this course will bring!

The second course I enrolled in is called 소통-행복과 변화로 가는 길. This course is not as much about exam preparation but rather about me learning in general. I’m sure it’ll plant a few good words or phrases in my head anyway though!

None of the courses have begun yet, but I’m really looking forward to it. It probably wont be easy as I have so many other things I want to do as well, but rather than thinking of it as a challenge, I’ll think of it as an amazing opportunity to grow.

Posted in books, Guides, Resources, Selfstudy, Study With Me, Uncategorized

Study With Me: TTMIK Your First Hanja Guide

Good evening guys!
Yesterday I finished the ‘Your First Hanja Guide’ book by Talk To Me In Korean and I wanted to share with you all how I’ve been studying with the book every day, for the past few months.
Before I begin I would like to mention that I really enjoyed working with the book and I definitely recommend it if you want to try studying Korean through hanja. If you are curious about the book then I recommend that you read this review by the brilliant Sofie,  watch this video by TTMIK themselves or you can read more about it on the mykoreanstore website where you can also buy the book.
Alright, let’s begin!

As always, I begin by preparing the things I need.
I usually have the book I’m studying with, my notebook, pens, correction tape and 원고지 paper. Start

I always begin by jotting down what book I’m working with, along with the page, subject or whatever else I find interesting.

Intro

I then open up my 원고지 notes and practice writing the character. The thing is, if you are only going through these hanja characters in order to improve your Korean skills, then you don’t need to practice writing them at all. As long as you know that they exist and what they mean, then you really don’t need anything else.
However, I have known for almost two years now, that I want to learn Chinese in the future, so I’m basically using this as an opportunity to get more comfortable with the different characters and their strokes, so in my case it simply makes sense to put a little more effort into my notes. I also found it oddly calming to repeat all the strokes over and over again. It reminds me of the reasons why I bought some calligraphy books in Korea. Maybe I’ll pick them up soon and give it a try..

Practice

I then go on listen to the accompanying audio files twice. The first time I simply listen carefully to the pronunciation and intonation, and the second time I read aloud while listening. Lastly, I then read the words and sentences aloud once again, without listening to the file, while trying to sound as natural as possible.

Track

I then move on the jot down some notes about the hanja character. I write down whatever I find interesting or relevant in order for me to better remember it the next time I see it, or to help make it easier for me to tell it apart from other characters.
It can be a breakdown of the characters that help create the new character or it can be some notes on how the character got it’s meaning.

Breakdown

Once I feel like I have written down anything of interest, I move on to write down the list of Korean words that are based on that hanja character. As always, I color code my notes. In this case, hanjas are always written in red, to make easier for me to spot them in my notes. After writing down all the hanjas, I take out my green pen and write down the words in hangul next to the hanja. That way I can actually read the words that I’m working with.
Lastly, I take my blue pen and write down the definition of the words that I didn’t know already.

vocabulary

As the last part I write down the sample sentences. I do this in order to get more familiar with both the hanja word, the sentence structure and spelling of the different words. It can be really helpful to copy down some notes like these. I also avoid writing the hangul version of the words in the sample sentences. I do this because I want to encourage my brain to start remembering them without the hangul. It usually isn’t a problem since the rest of the sentence kinda gives the meaning away, and if not then I can simply find the hanja in my notes right above the sample sentences.

Example sentence

And that’s basically it! It’s pretty simple but I get to read, listen, write and speak as well,  so I found it quite helpful.
As for time, this specific character was pretty simple and didn’t take a lot of time, but some characters are a lot more tricky and has a lot more related words, so it’s going to change a lot depending on the characters your working with.

I hope you all found some inspiration to study with this (or another) book.

Posted in books, Guides, Resources, Selfstudy, Uncategorized

Ridibooks (reader) – The Korean learners best friend

I have talked about how reading in your target language can approve your language skills a few time before so I’ll try not to repeat myself today. You might find this and this helpful though!
Instead I would like to introduce you all to the Ridibooks reader app. Ridibooks is a Korean ebook website with a huge variety of books to chose from. Everything from Manwhas and self improvement books, to fiction, history books and magazines. They even have free books right here – No more excuses!
I have mentioned the site before and no I’m still not sponsored or anything. Just a genuine fan!
Lately I have been reading ebooks more often than I used to and honestly, I still prefer physical books. However, I have come to really appreciate ebooks and especially the ebook reader that ridibooks offer, which is why I’m now here to give you guys a tour of this great tool, from a language learners aspect!

When you open the app, you’ll find the books that you have downloaded on the device that you are using. There’s not much to say about this as it is pretty straightforward.
At the bottom of the screen you’ll find a little menu.

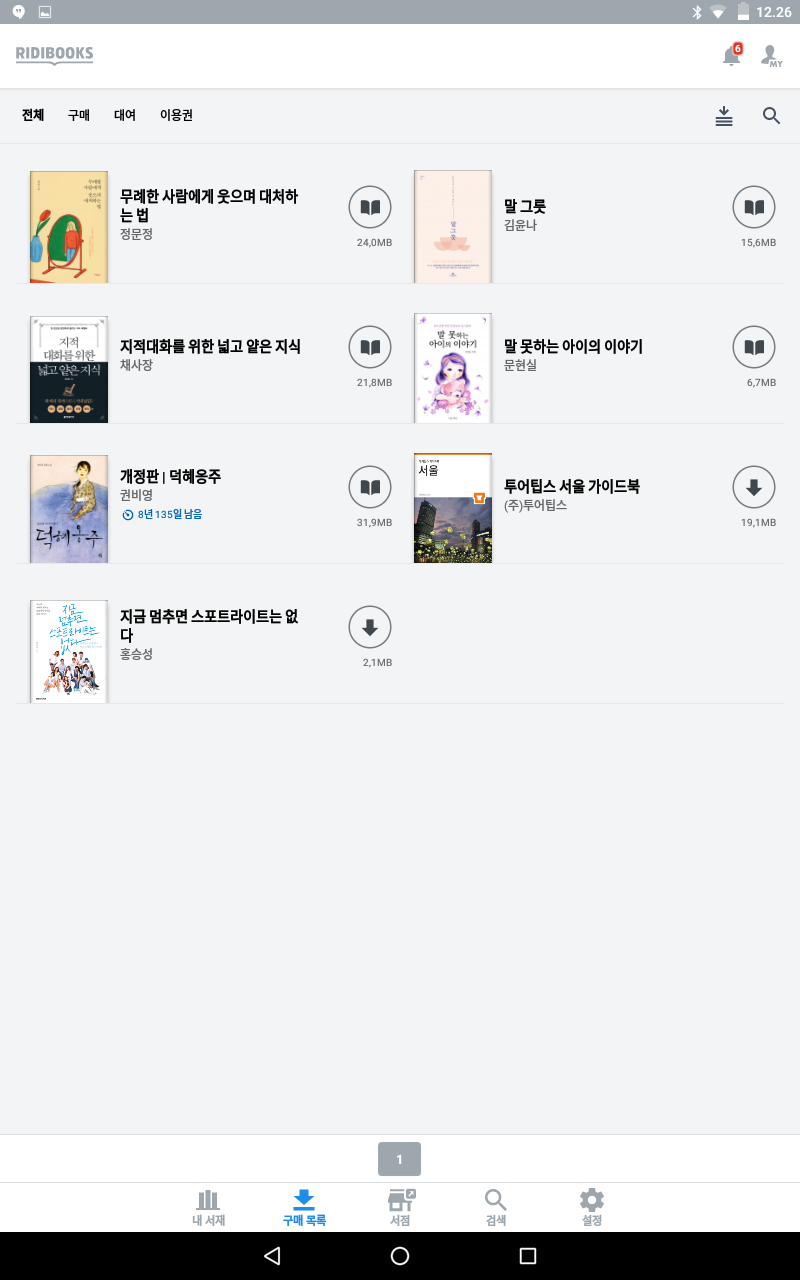
Right now we a at the first icon 내 서재 (My library).

Screenshot_20180317-122514

The next icon is 구매 목록 (Purchased books). This shows all of your books, including those that you haven’t actually downloaded on your current device. From here you can download the next book you would like to read. (or re-read)
As you can see from the pictures, I have a few books that I haven’t downloaded because I read then via my laptop, before I got my studybuddy (My tablet).

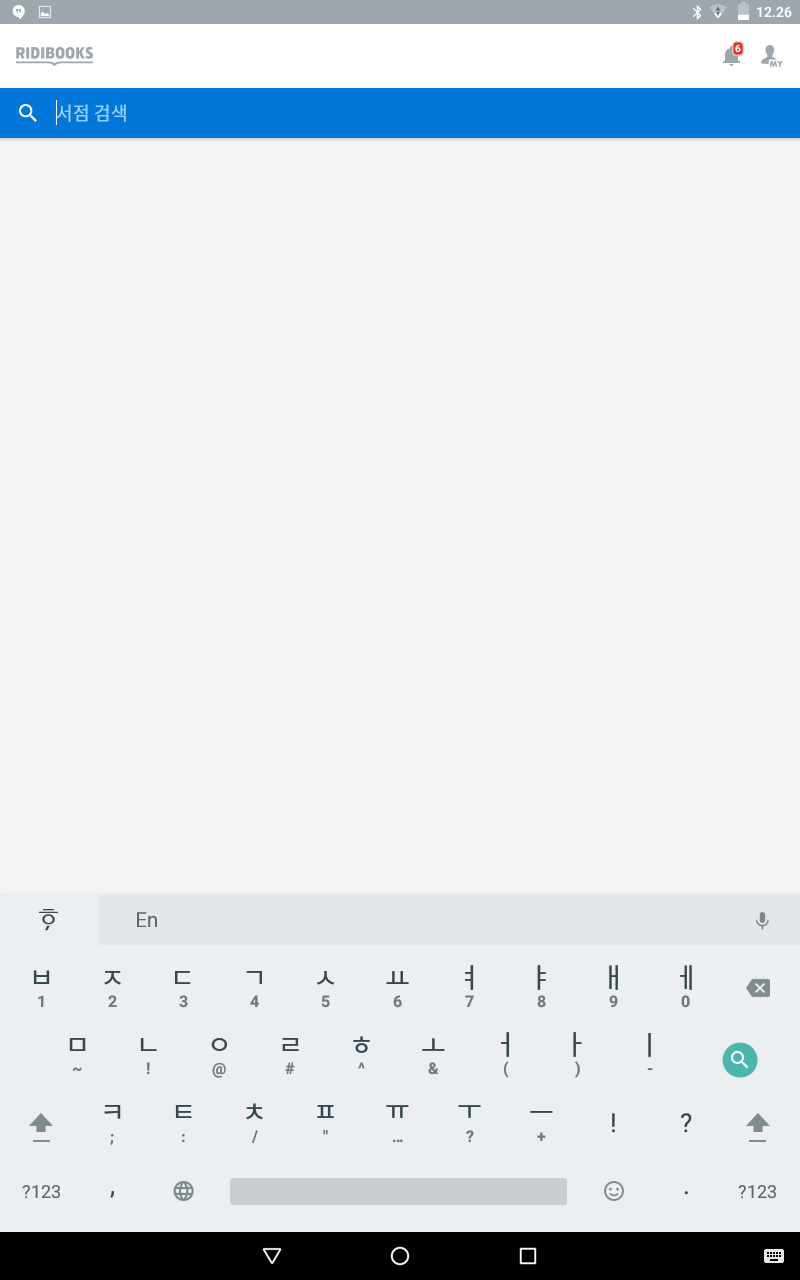
The next icon is 서점 (Bookstore). If you click here you get transferred to the ridibooks website where you can take a look around for new books. This too is pretty straightforward.

Screenshot_20180317-122627

The 4th icon is 검색 (Search). This is also pretty straightforward. You simply search for whatever book you are interested in and then it’ll redirect you to the website if they have the book you searched for. I never use this to be honest as I feel like it makes more sense to just go straight to the webshop.

Screenshot_20180317-122656

Okay, so enough of the standard boring stuff lol.
If you click on a book from you library it’ll open on the page that you where on the last time. You can also add your own bookmark by clicking on the icon in the upper right corner, but I have never experienced that the app doesn’t automatically saves the page so I haven’t used that feature in years. I guess I’ve gotten lazy.. 그냥.. 귀찮다 ㅎㅎ

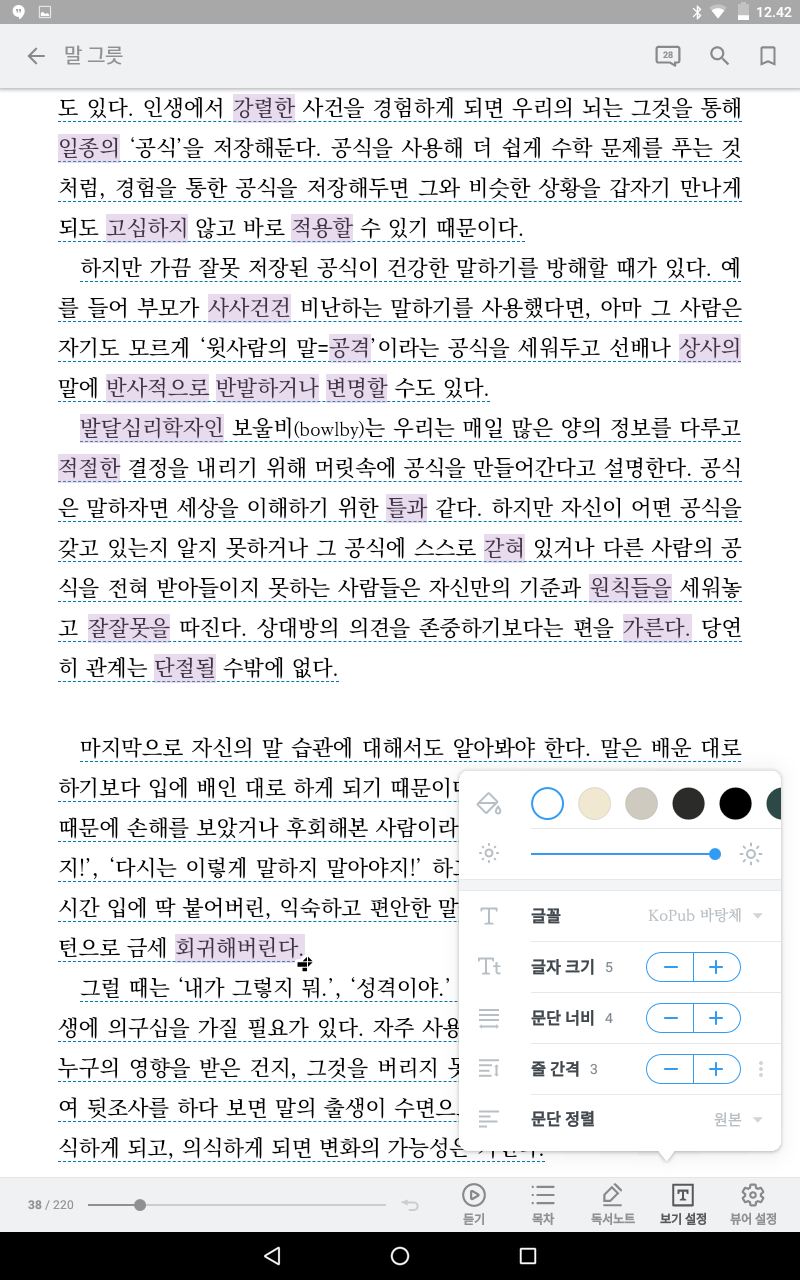
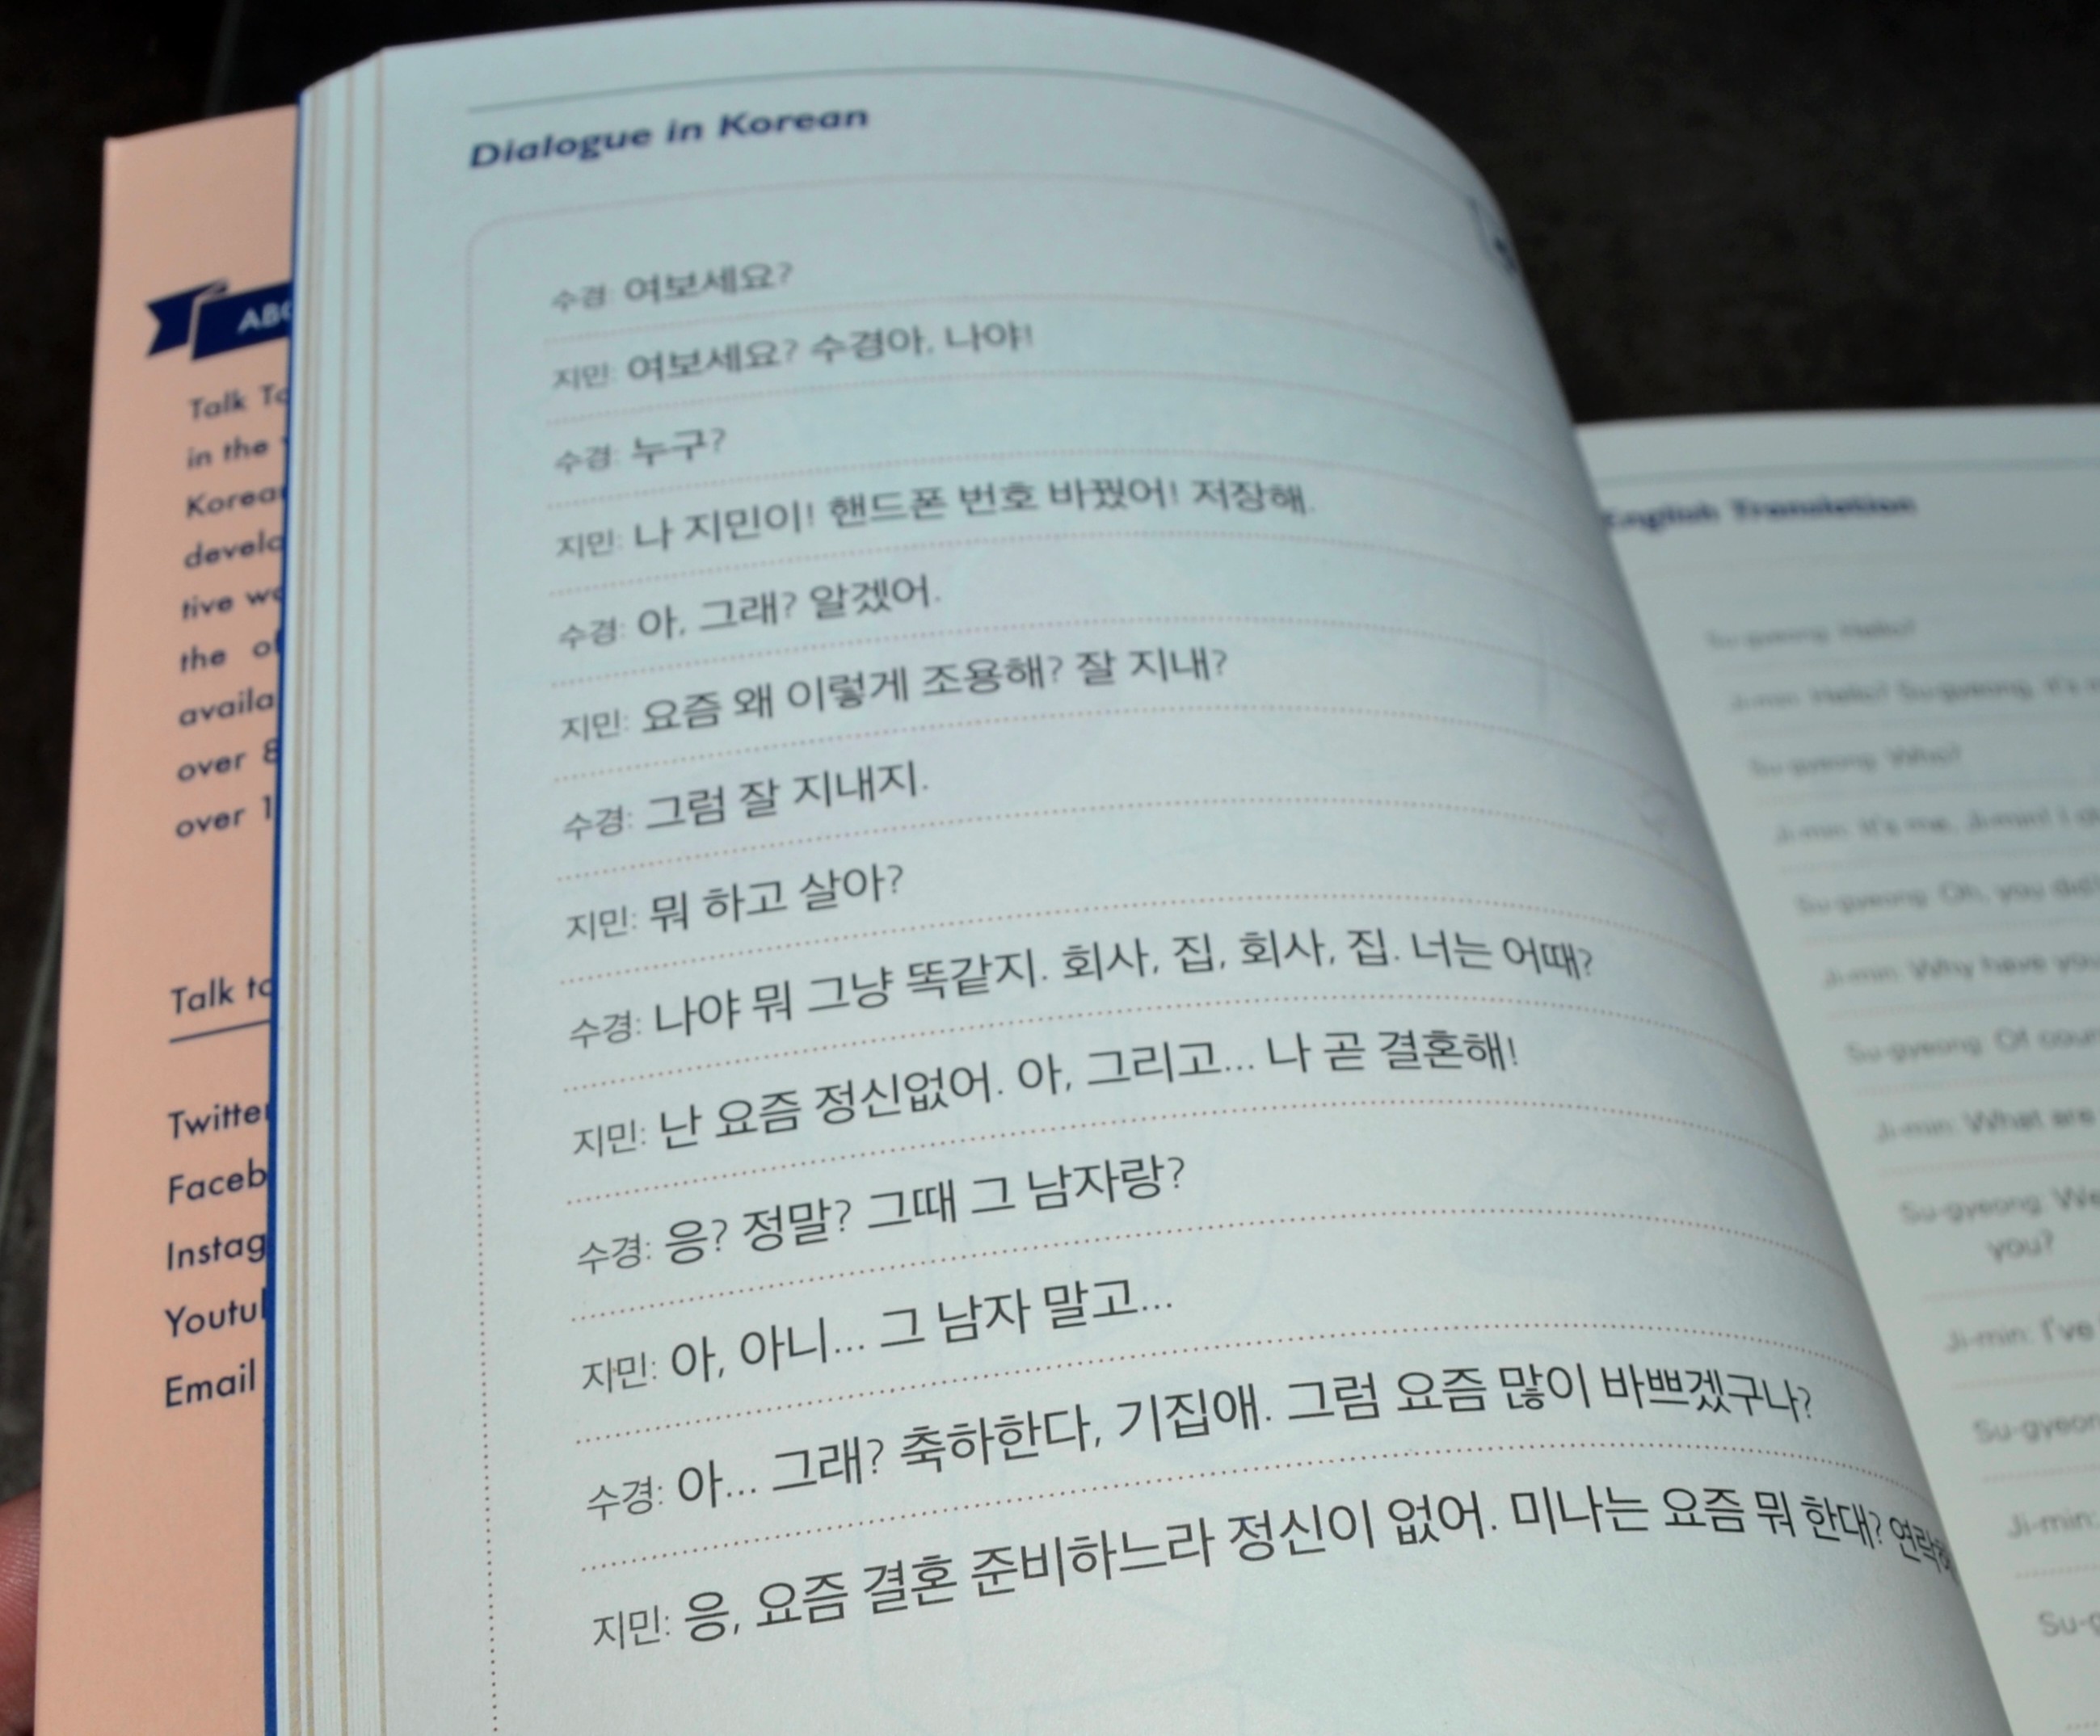
Anyway, this is the page that I was on when I took the screenshots a few days ago, in a book called 말 그릇. I’ve talked about it on instagram but I think this is the first time that I’m mentioning it on the blog. You can find it here if you’re curious.

Okay this is where all the fun stuff happens!
At the bottom of the screen you can see how far along you are with the book which is always fun and next to that you have a 듣기 (listening) icon. It’s not an audio book though so I don’t really use that function, since it’s just a typical ‘robot’ reading.

Screenshot_20180317-122751

The next icon is 목차 (Table of contents). You can see how far you are along and you can also use it to skip to a certain chapter if you wish. I sometimes use it as a shortcut if I want to re-read a certain part of a book.

Screenshot_20180317-122806

The third icon is 동서노트 (reading notes).
This. Is. THE. Best. Feature!
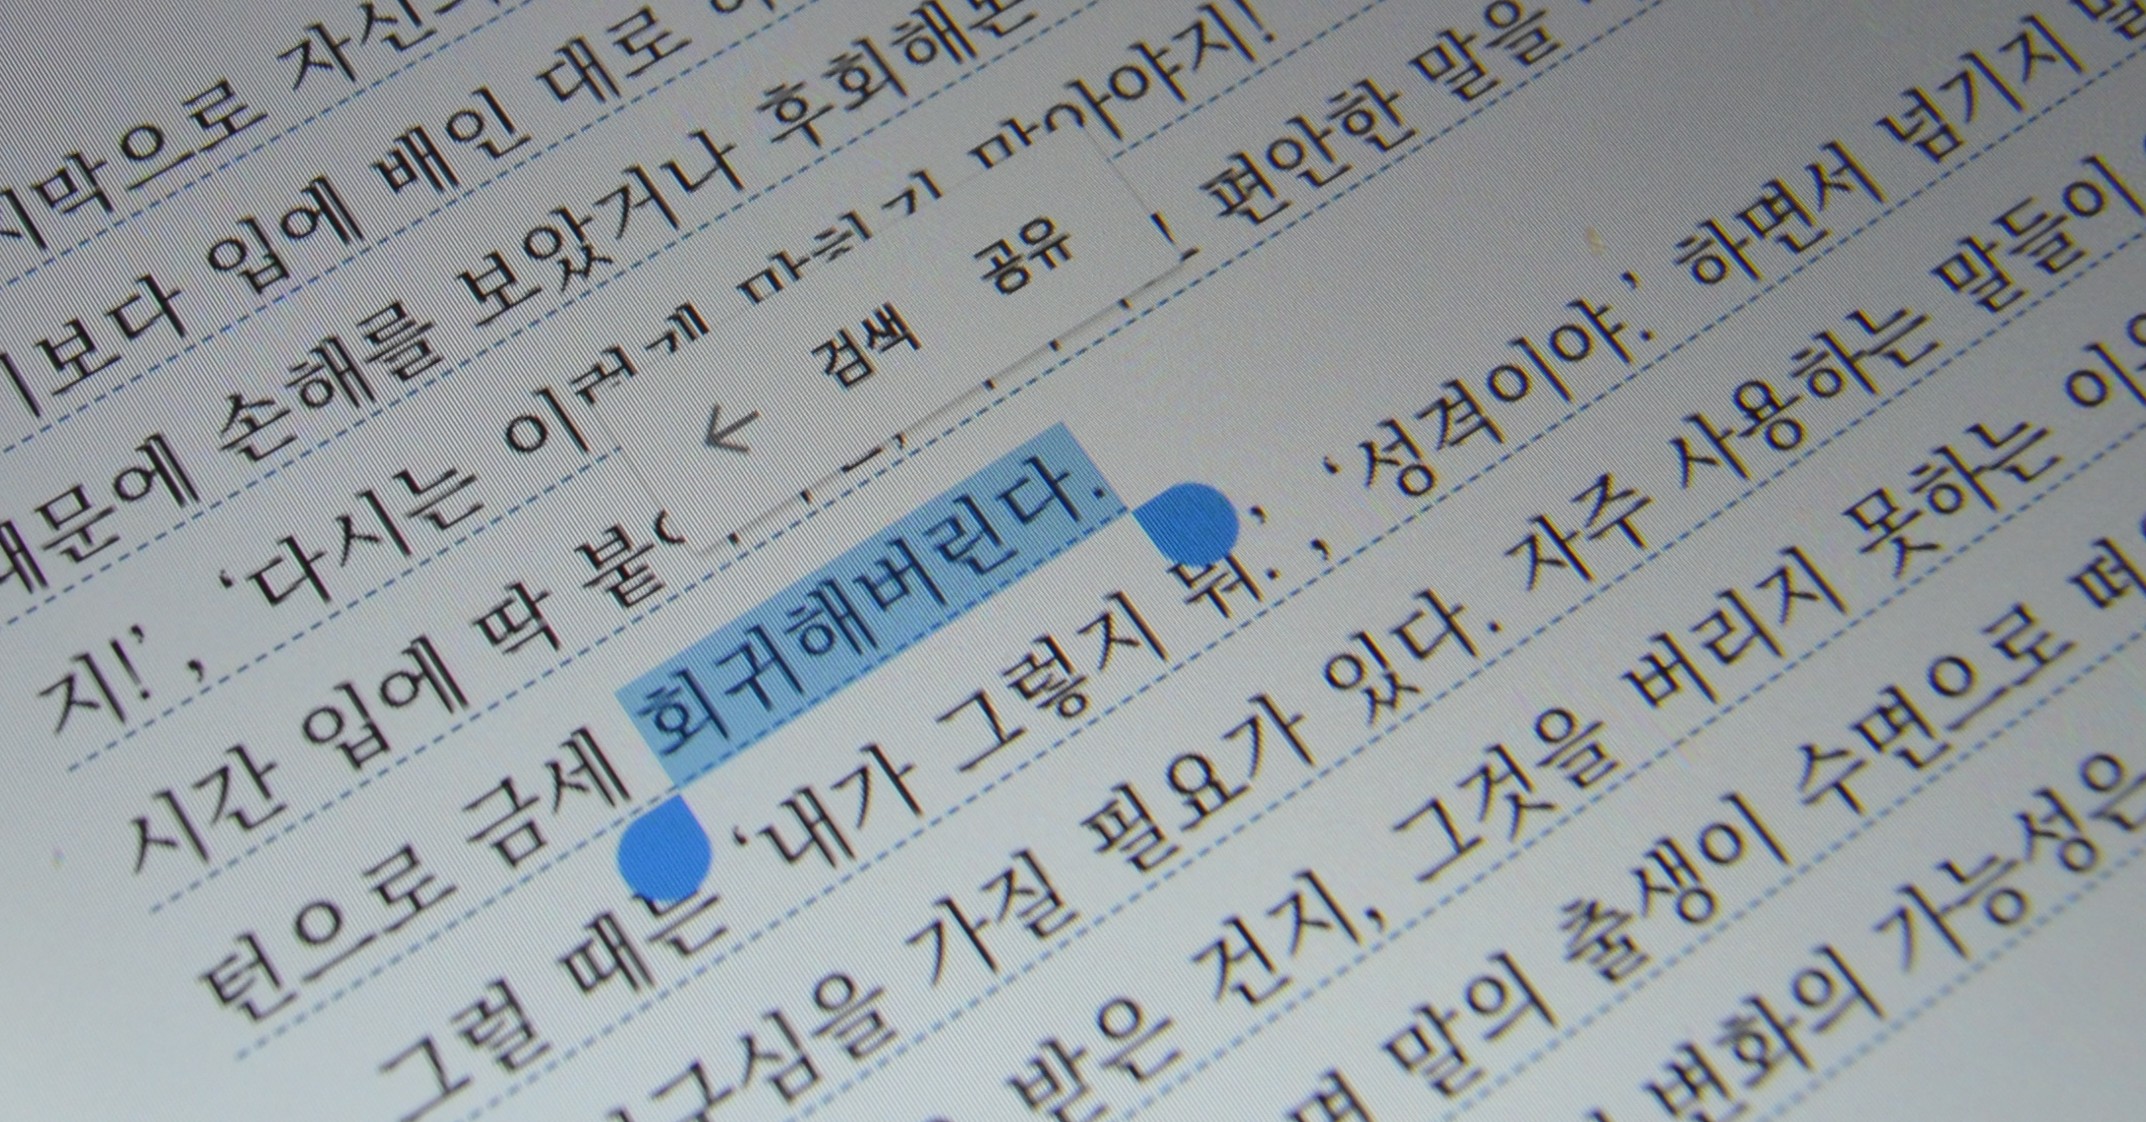
Okay so let me explain. When reading an ebook through this reader, you can mark a word from the text and a list of new features will appear.
The first feature is 형광펜 (Highlighter), which works just like a physical highlighter. You can use this feature to highlight any word or sentence that you find useful or that you need to remember.
The next icon is the purple dot. The color of the dot indicates what color you use to highlight with and if you tap on the dot, a variety of colors will show up, allowing you to easily switch back and forth between colors. In other words you can do color coding! Use one color for new vocabulary, another for new grammar points and a third color for names and locations. It also gives you the opportunity to underline a word instead of actually highlighting it. Whatever you need!

marker optionsColorcoding

The next feature is 메모 (Memo). By clicking on memo you’ll get a little box where you can add.. well. A memo.. To the word that you have marked. It could be the definition or maybe a sample sentence using the highlighted word. It so cool! And yes this genuinely makes my little geeky heart excited.

Saving a memo

If you chose to add a memo, then you get a little symbol by the word to remind you that you added something to it.

The next icon is 듣기 and it works just like the 듣기 at the bottom of the screen, except it only reads the part that you have marked.
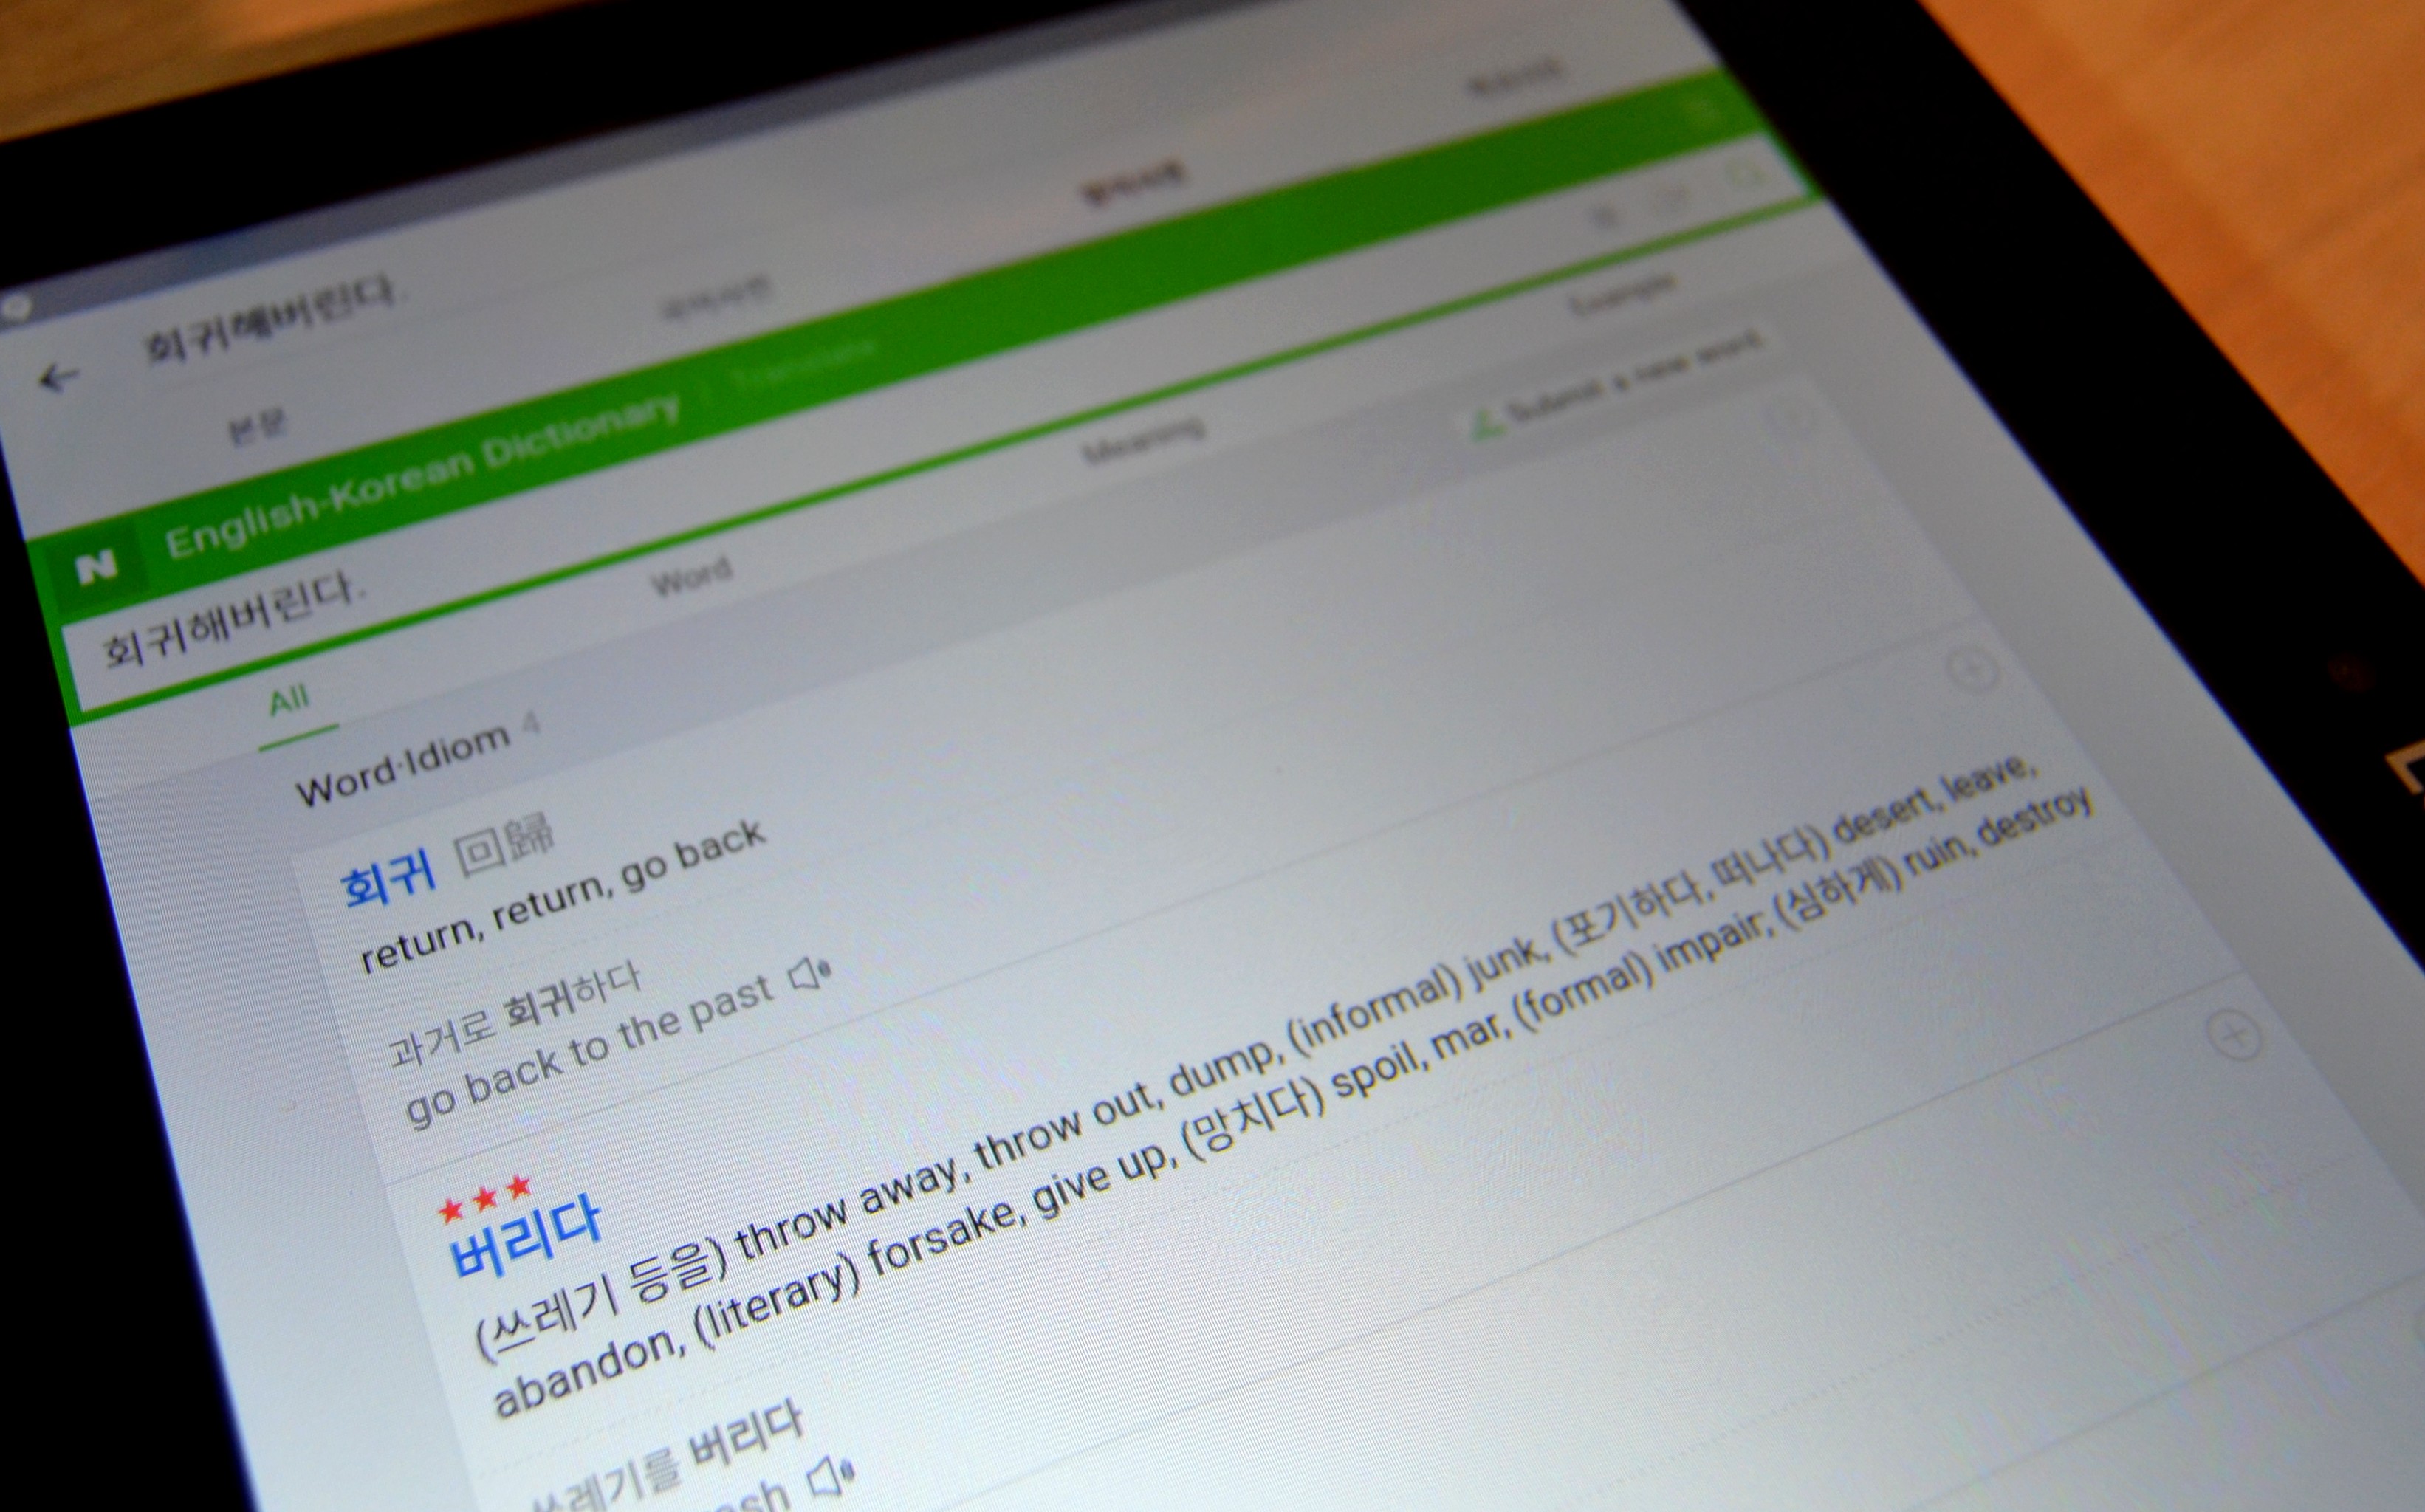
If you tap at the 3 dots next to 듣기, then you’ll get two more options called 검색 (Search) and 공유 (Share).

other options
Search is probably my favorite feature. It you tap the search button then the app will connect you to Naver Dictionary. This means that you can look up words straight from the book without ever leaving the app. Once you’ve gotten the information that you needed, you simply tap the arrow in the upper left corner and you be back on the page you where reading.
It’s just so freaking convenient!

dictionary

As for the share option, it’s not at all a necessity but I really really love it! If you tap the share button, then you get two alternative ways of sharing it.
The first one is 이미지로 멋지게 공유 (Share as a cool picture) and 텍스테로 공유 (Share as text). I love the picture option. If you come across something inspiring or noteworthy then you can immediately create a beautiful quote picture, which can then be uploaded from the app, straight to you social media accounts.
Again, not at all a necessity, but still really cool!

shareing

Screenshot_20180317-124222

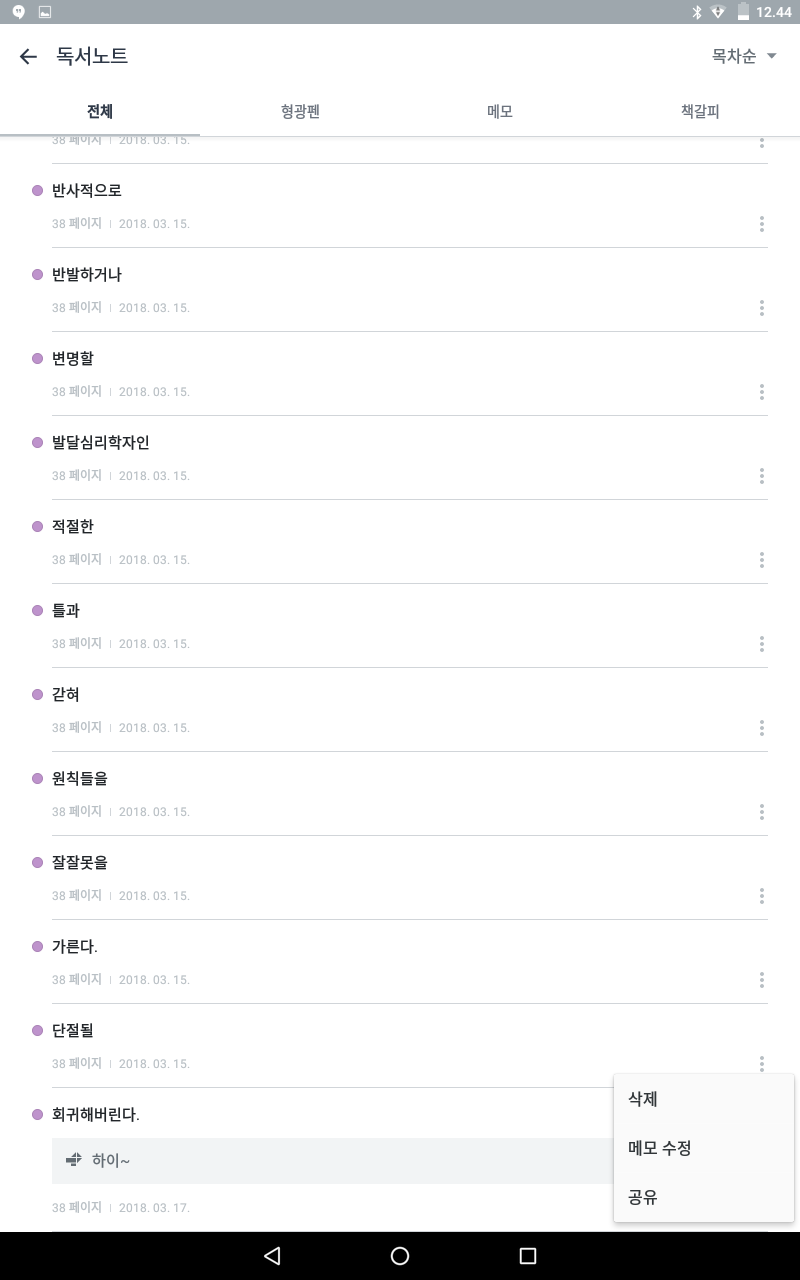
Okay, so that was all of the options that appear when you mark a word. Now let’s get back to the 동서노트 (reading notes) icon at the bottom of the screen. It you tap the reading notes icon, then you get a list of all the additions you made to the page. In my case, you can see that I highlighted new vocabulary with the purple marker, and now every single word that I have highlighted has been added to this long vocabulary list. If you do color coding then you can also make it show the words or sentences that are highlighted with a specific color. You can also access the memos that you make from this page.
I use the feature really often to create online flashcards via memrise or quizlet. I simply copy and paste the words.
You can also use it to track your progress. Try accessing a list from a book you read a year ago, and see how many of the words you know now. It’s a lot of fun!
If you wish to delete a note from the list, you simply tap the three dots next to the note and choose 삭제. Super simple!

Screenshot_20180317-124439

It’s also possible to change the font size, colors and so on, you simply tap the 보기 설정 icon. You can adjust pretty much everything you want to.

Screenshot_20180317-124300

As I mentioned in the beginning of this post, I still prefer hard copies and writing my notes in hand, but you literally have any tool you might need for language learning, through this reader. I use it on a daily basis because it’s just too convenient not to, especially on days where I’m out and about or traveling. I totally recommend giving it a try if you are learning Korean!

Posted in books, Resources, Selfstudy, Uncategorized

REVIEW: Real-life Korean Conversations: Intermediate – By TalkToMeInKorean

I ordered this book by TTMIK around the time they published it, but I didn’t get to start using it until just recently. I have now finished it and as I have promised a few people, I’m now here to share my thoughts with all of you!

1

Table of content:

toc

Structure breakdown:
Each chapter begins with a 2 page dialog which is then followed by a vocabulary list.

2

3

4

vocabAfter reading the dialog and following up on the vocabulary, the real fun begins. A grammar pattern from the dialog is introduced and followed by a few sample sentences that allows you to become more comfortable with that specific pattern.
You then have two short assignments involving that pattern. The TTMIK crew guides you through the vocabulary so you only have to focus on the actual pattern and how to use it. Below the assignment you’ll find the answer key.

p
After checking your answers, you see two other patterns that are related to the main pattern that you are learning, which then introduces two alternative ways of expressing the same thing as the main pattern. It can be by using other words, another type of grammer or even another level of politeness. Below these patterns you’ll also find a sample sentence as well as information on why the pattern is different/similar, how to use and when to use it.

final

Each dialog has three main patterns, that all comes with assignments and alternative patterns.

Good things:
– When reading the dialog, the Korean version is on the left side, and the English version is on the right side. This way you can check how much of the dialog you understand line by line if you wish without having to flip back and forth between pages, or if you are more like me, then you can easily skip the English version completely. You can adjust it according to your preferences.

– The book comes with audio files. A useful tool for any language learner.

– Vocabulary list. A really helpful tool and a good indicator of your level. I’m always excited if I know most of the words on the list. Also, it makes it easier to study on the go, because you don’t need a device to look up the words (though I’m sure most of us just do in through our smartphones anyway).

– The same grammar pattern can be found in different chapters. This is really helpful when it comes to expanding your knowledge of how to use that specific pattern. It’s also a great reminder that there’s never just one way of expressing yourself

– The answer key is printed right after the practice assignments, in a discreet font and color. This is GREAT! When I do assignments in books, I check the answers after each assignment because I don’t want to complete a full page of assignments just to discover that I had misunderstood what I was supposed to do. However, this usually means that I have to go back and forth between the assignment and the answer key. This is why I love it when books have the answer key printed along with each assignment.
As mentioned above, it’s very discreet so you don’t have to worry about the answers jumping to your eyes before you actually need them.

– The book changes between the different politeness levels, unlike many other books who only teach the 존댓말 version.

– The general design of the book is great. It’s user friendly and pleasing to the eyes.

– It has cute drawings with empty speech bubbles. Okay this might sound odd, but think about it! You can go back write your own example sentences using the grammar that you just learned. Sounds like fun to me!

– Fun and realistic dialogs. I know that it kinda says so in the title, but trust me, titles aren’t always honest. I had quite a few giggle moments while going through the book and many of the situations were super relatable.

What could be improved:
Nothing really.

Final thoughts:
Overall I really liked the book. Personally it was mainly reviewing for me, as most dialogs only had 1-3 unknown words and I only came across  1 unknown grammar point. For a short time I also wished that the dialogs had been a bit longer, but that’s all just because I’m at an high intermediate stage. If you’re a high beginner/low intermediate stage then this book would be absolutely perfect for you. At this stage it’ll be very helpful to have a book that explains and compares similar grammar patterns as well as help expand you vocabulary. It’ll also help you gain some confidence if you find it difficult to practice with native speakers.

If you’re interested in the book then you can find it right here! They also have it in ebook format and in a beginner edition as well.

Also, I did take a few pictures while studying with the book, so I’ll have another ‘Study With Me’ post up, in a week or so!

Posted in Guides, Resources, Selfstudy, Study With Me, Uncategorized

Study With Me: Kmooc – 한국인의 똑똑한 밥상

Lately I have been getting quite a few questions on how to study rather than what materials to study with which has made me realize that self-studying isn’t an easy task to everybody. For some reason it has always seemed quite natural to me and I never struggle to find materials or new methods to learn. I adjust everything to my needs and I can spend hours on relatively simple materials because I want to get the very most out of it.
Since I always struggle to explain HOW to study, I figured I’d start a series on the blog where I simply just show you guys what I’m working with and how. Hopefully you can feel inspired and try out a few of the things that I do, and as soon as you have an idea of what you like to do and what works the best for you, you can simply start to pick and choose from your experiences. The best way to study is honestly impossible to write down. It’s such an individual thing and you just have to try a lot of different approaches to see what works for you and what doesn’t.

Today I want to show you guys how I’m going through a Kmooc course called 한국인의 똑똑한 밥상.

asset-v1_CBNUk+CBNU05k+2017_L5+type@asset+block@전북대학교_K-Food_한국인의_똑똑한_밥상_이미지

This is a course in Korean, for Korean people so obviously that influences my study approach. There’s not any explanations to vocabulary or grammar that I need to write down since it isn’t created for foreigners. Instead I take a lot of notes on the actual content and the unknown vocabulary.

I begin by collecting all of my materials. I’m currently obsessed with my Ecco Pigment pens and I use a Tombow correction tape. It’s the best correction tape I have tried so far (and I have tried A LOT), and I totally recommend it.
My yellow Aurora notebook is only used for my Kmooc course notes.

Study items

I then get my studybudy ready a.k.a my tablet. When I know that I’ll be studying for a long time, I always use the Pomodoro technique. I might write about it in an blog post soon, but you can just google it if you’re curious. Basically you just have a timer to tell you when and for how long you should take breaks to get the most out of your studying efforts. I also use my tablet to look up vocabulary. As soon as my studybudy is ready to go, I put my phone away in my drawer and I don’t touch it again until I’m on break or done with studying.

Timer

I begin by watching the video lesson. The lesson is in Korean and has the option of Korean or English subtitles. I watch it with Korean subtitles because that way I have a clear image of how much I understood from the video. I listen carefully and read along as the professor starts the lesson.

Korean version

I then re-watch the lesson with English subtitles. I do this to close any gaps in my understanding as well as to confirm the things I believe I understood from the lesson. It’s a good way to find out just how much you might have missed or maybe even misunderstood.

English version

Now that I have closed any possible gaps, I’m moving on to taking notes. I switch back to Korean subtitles and look at the transcript. At this point I understand more than enough to choose whats important and what is not from the transcript, but if you are struggling then you can keep the English transcript and either write you notes in English or simply mark the time stamp and then find the same paragraph in the Korean transcript. I recommend the latter. Even if you struggle to understand the notes you are jotting down it’ll still make you feel more comfortable with the words, the grammar and the sentence structure. A third option could be to write down each of the points you find important, in both Korean and English. Just do whatever works for you!
My notes a mostly just copied straight from the transcript, however I do change certain parts. I find that this course repeats the same points quite a few times and I see no use for that in my notes. Also I change things like ‘우리나라의’ to ‘한국의’, because it would just be too odd for me to refer to Korea as ‘우리나라’ as a foreigner.
Basically it’s all just about adjusting everything to your needs and preferences.

It took me just over 6 pomodoro sessions to finish my notes, so around 2 hours and 30 minutes.

Note overview

Now I move on to vocabulary. As for me, I find it way better to learn vocabulary through context so I always look up words in the end. By this point I have already learned a handful of words through context and I find that these words stick to my brain way easier than all the other words.
I now go through the transcript once again, writing down all the words I still don’t know or are unsure of. Even if I know that I wrote down a certain word from the last lesson as well, I still write it down. Repetition is your friend in this case, and someday it’ll suddenly stick!
I always color code my notes. It makes everything way more organized and it’s such a big help when you want to review your notes.

I spent another two sessions (50 minutes) on looking up words and writing them down.
Vocabulary notes bestVocabulary notes

Lastly, I create a Quizlet set. This is in itself a great way to review everything, because you have to write down all the words once again. When I’m done I can usually already remember a few of the words, which makes me feel great when I actually start practicing via the app.
Quizlet also remembers definitions so if you (or someone else) have written a certain word then it’ll often suggest previous definitions to that word, which can save you a lot of time.

It took me around 25 minutes to create my set.

Quizlet

In the end I spent just over 4 hours studying a lesson, based on a 9 minute video + whatever time I end up using on Quizlet later. I could have just watched it once with English subtitles and then moved on, but why not take advantage of the video and the transcript, and get as much out of it as possible? At least that’s how I feel. If you struggle to stay focused or if you hate working on the same thing for a long time, then obviously this might not be the best approach for you.
It’s all about adjusting!

I hope this was somewhat helpful!

Posted in Resources, Selfstudy, Uncategorized

Gaming in Korean

A while a ago I downloaded a game on my phone called Homescapes. I was just thinking that it would be a great way to relax for a few minutes during my somewhat busy schedule, but much to my surprise the title changed to 꿈의 집 as soon as it was installed on my phone. It surprised me because my phone settings aren’t set to Korean and I hadn’t even opened the app yet. Somehow it just decided that I should play the game with Korean as the default language ¯\_(ツ)_/¯
The game itself is super simple and you have probably played tons of games like this one, but there’s also a story to follow in the game, which suddenly made everything a lot more interesting for me. It was fun and interesting to follow the game guides as well as the story line, now that it was suddenly all in Korean. Especially since some of the pop-up messages are only showed for a few seconds so you have to keep up and pay attention if you want to follow the story (which isn’t necessary to play the game, so don’t stress if you’re struggling with it).
I actually have played a game in Korean before, without really putting much thought into it, but playing this game suddenly made me realize just how big of a language learning resource games can be. I mean just think about it for a moment, there is games out there for everyone. There’s games about everything, games that are time consuming, games that are not, games with stories and games that you can play while letting your brain go to auto pilot. What a great way to learn new words!
Granted, certain words might not be that relevant, depending on the type of game you play, but it’s still a great way to get exposure to the language without looking through books, taking notes and so on.

Here’s a few screenshots if you are curious about Homescapes.

HS1HS2HS3HS4

Obviously this realization made me want to play other games as well. I didn’t really know which games to play though, so I simply Naver searched 추전게임 and looked around. I ended up with a game called 마녀의 샘. This game is a lot more story based and therefore demands more from me as well as my Korean skills. I also decided to just figure everything out on my own instead of looking up the words I don’t know, so I have had a fun challenge figuring it out for the past week or so.

Here’s a few random screenshots from 마녀의 샘.
(NOTE: this game isn’t free like Homescapes)

MS1MS2MS3MS4

This morning I had another realization that made me really really excited. You see, recently my laptop died on me and I had to get it fixed. This morning I was looking through my backup files to see what I wanted to transfer back to my laptop and my eyes came across a game title. A game that most of you have played at some time. A game that practically sums up my entire childhood.
I’m obviously talking about THE SIMS!
The sims is an amazing and fun resource and it adds a great visual aspect as well. I immediately looked into it and started downloading the game as soon as I was able to confirm that I could actually play it in Korean.
It’s still in the process of installing (16% so far! This might take some time lol) so I don’t have my own screenshots from the actual game yet, but if you are curious then just do an image search on 더 심즈.

sims

Also, if your phone settings are in Korean, then all of your games will most likely be set to Korean as the default language, unless the game doesn’t support the language. Maybe you can give that a try if you already have a game that you like. 🙂

I hope you guys found this interesting and that you can find a great game to play 🙂

Posted in drama, Resources, Selfstudy, Uncategorized

Drama lines ep. 1

These days I have been quite the fan of Korean subtitles on my dramas and movies. I know I know, I’m late to the game!
I generally don’t use subtitles at all but after adding the Korean ones I seem to be catching a lot more new words and grammar points. Normally my general understanding is pretty good and I’m pretty darn good at understanding through context, which doesn’t always turn out to be a good thing.
I have discovered recently that when I’m watching dramas I come across a lot of things that I don’t understand – AND I DON’T EVEN NOTICE THAT I DON’T UNDERSTAND IT! I understand what is being said and what is happening through the context, so I don’t even notice all the unknown words being said.

Don’t get me wrong – You can definitely learn the meaning of words through the context they appear in, but obviously things go a lot faster when you actually notice the words and actively look them up.
Therefor I have now started to actively jot down sentences on my phone while watching dramas and then I transfer them to my notebook at a later time. I prefer having all my notes in the same place so this is the most convenient method to me, and the transfer process also doubles as reviewing all the sentences 아싸!

So what do I write down?
ANYTHING interesting.
– Sentences that unknown words  or grammar appear in.
– Sentences I feel like might come in handy at a later time.
– Sentences where already known words or grammar points are used in a way that I never thought about using them in myself.

Literally anything that catches my attention.
I thought that it might be fun to share some of these sentences with you guys – Maybe you can even guess which drama the sentences comes from? I’ll also add a vocab list later, if you would like me to. Let me know!

  1. 이제 살 것 같다.
  2. 너 되게 뻔뻔하다.
  3. 나였으면 넌 여기 없지. 옥상에서 던져버렸어.
  4. 다듯한 차라도 마시면 속이 좀 나질거야.
  5. 거기가 맨바닥이라는 말은 아니고…
  6. 네 말대로면, 하늘에서 나라온 고미남이란 돌멩이를 맞아 기절했던 건 황태경이야.
  7. 내가 무슨 치한이냐? 소리는 왜 질러?
  8. 지금은 거직으로 다른분들은 속이고 있지만..
  9. 아니, 그러니까, 잘 좀 묶어 다니지.
  10. 너랑 더 상대 안해.
  11. 그래. 너 때문에 난 더럽고 냄새 나고 축축 하고 아파.
  12. 곤란하게 만들어서 죄송합니다.
  13.  아주, 만두부인 속터지는 소리 하고 있네.
  14. 야! 너 태경형한테 또 사고 줬냐?
  15. 비밀을 벌써 하나 털렸네.
  16. 내가 다 망쳐버렸어.
  17. 나~ 이렇게 학교도 안가고 연예인이나 졸졸 쫓아다니는 이런 핏덩이들이랑은 달라.
  18. 버텨야돼. 여기서 나가면 다 들킬거야.
  19. 너 그렇게 맹렬하게 쓰고 있는데 별 게 아니야?
  20. 우리 사이 진짜 인척 하자고 했는 건 너고 나는 그걸 받아드린거야.

Did you come across an interesting sentence?
Can you guess where the sentences are from – The two most important names are included in the sentences!
Anyway, I hope you found this useful and I’ll see you guys another day with new sentences. 🙂